
1. Introduction
You might ask, "Why should I run my own Mail Server?", well, running your own mail server gives you full control over your email infrastructure. Some benefits include:
- Independence from third-party providers (Google, Microsoft, etc.)
- Use of your own domain (e.g.,
you@yourdomain.com) - Full control over privacy, data retention, and spam handling
- Hands-on experience with email protocols and DNS
Note: Self-hosted mail servers require strict attention to security and reputation management. Misconfiguration can lead to spam blacklisting or undeliverable emails.
2. Prerequisites
You'll need the following:
- VPS: At least 2 vCPU, 4GB RAM, 20GB SSD storage
- Static public IP address
- Domain name with access to DNS settings
- Linux knowledge (basic CLI and server admin)
Recommended OS: Debian 11/12+ or Ubuntu 22.04+, in this guide I will use Ubuntu 24.
3. VPS and IP Blacklist Checking
While you can use a local server in your home network, it's highly recommended to use a VPS for reliability and uptime.
One VPS provider I suggest if you are in a budget is Contabo, their cheapest option (4$ per month) is enough to run a mail server.
After you have obtained your VPS, you need to check if your server's IP is on any blacklists. This is crucial because if your IP is blacklisted, your emails will likely end up in spam folders or be rejected outright.
You can check your IP against major blacklists using these tools:
If listed, contact your VPS provider or request a clean IP. Don't proceed if your IP is on major blocklists.
4. Securing the VPS
Now that you have a clean VPS, let's secure it before installing any software. This is crucial to prevent unauthorized access and attacks.
Here are the basic steps to secure your VPS:
- Update packages:
apt update && apt upgrade -y
- Create a non-root user and grant sudo privileges:
adduser mailadmin
usermod -aG sudo mailadmin
Log in as mailadmin for all future commands.
- Add SSH key authentication:
Generate an SSH key pair on your local machine if you don't have one:
ssh-keygen -t ed25519 -C "your_email@example.com"Copy your public SSH key to the server:
ssh-copy-id mailadmin@your_vps_ip
- Secure SSH:
Disable root login & use SSH keys only:
sudo nano /etc/ssh/sshd_configChange or add the following lines:
PermitRootLogin no
PasswordAuthentication no
Restart SSH service:
sudo systemctl restart sshd
- Install firewall and fail2ban:
sudo apt install ufw fail2ban
Set up UFW to allow SSH and ports needed for mail:
sudo ufw default deny incoming
sudo ufw default allow outgoing
sudo ufw allow 22,25,80,110,143,443,465,587,993,995,4190/tcp
Enable UFW:
sudo ufw enable
Your VPS is now secured with a non-root user, SSH key authentication, firewall, and fail2ban.
5. Reverse DNS (PTR Record)
A valid PTR (reverse DNS) is critical for email deliverability.
- Set your IP's PTR record to
mail.yourdomain.com - This is configured via your VPS provider's control panel
Example:
| Type | Name | Value |
|---|---|---|
| PTR | <your IP> |
mail.example.com |
Don't skip this step! Without a valid PTR, your emails will likely be marked as spam or rejected.
Also set it up for IPv6 if you have one.
6. Basic DNS Records
You should have a domain name ready to use with your mail server.
If you don't have one, you can buy one from any domain registrar, I personally suggest Cloudflare.
Here are the essential DNS records you need to set up for your mail server:
Note: For the MX record, 10 indicates the priority of the mail server. Lower numbers indicate higher priority, so if you have multiple mail servers, they will be tried in order of priority.
We will also need some additional records for SPF, DKIM, and DMARC to ensure proper email deliverability and security, but we will set those up later after installing the mail server.
7. Installing Mailcow
Install Docker, Docker Compose & git:
You can follow the official Docker installation guide (Ubuntu installation guide), but here are the quick commands for Ubuntu:
sudo apt update
sudo apt install ca-certificates curl
sudo install -m 0755 -d /etc/apt/keyrings
sudo curl -fsSL https://download.docker.com/linux/ubuntu/gpg -o /etc/apt/keyrings/docker.asc
sudo chmod a+r /etc/apt/keyrings/docker.asc

echo "deb [arch=$(dpkg --print-architecture) signed-by=/etc/apt/keyrings/docker.asc] https://download.docker.com/linux/ubuntu $(. /etc/os-release && echo "${UBUNTU_CODENAME:-$VERSION_CODENAME}") stable" |
sudo tee /etc/apt/sources.list.d/docker.list > /dev/null
sudo apt update
And then install Docker and Docker Compose:
sudo apt install docker-ce docker-ce-cli containerd.io docker-compose-plugin -yAnd finally install git:
sudo apt install git -yClone the mailcow repo:
I recommend cloning the mailcow repository inside /opt, you might need to access it with sudo:
sudo git clone https://github.com/mailcow/mailcow-dockerized /opt
cd /opt/mailcow-dockerized
Configure mailcow:
To configure mailcow we will use the generate_config.sh script:
sudo ./generate_config.shIt will ask you to enter your mail server hostname (e.g.,
mail.example.com) and other settings.Start mailcow:
We can now pull the necessary Docker images and start mailcow:
sudo docker compose pull
sudo docker compose up -d
Might take a while to download all images, so be patient.
Access the admin UI at
https://mail.example.com/admin/
(Default login:admin, password shown in startup logs, ormoohoo)Note: You should change the default password after logging in for the first time.
8. Adding a Domain and Required DNS Records
Let's now add your domain to mailcow:
- Log in to the mailcow admin UI at
https://mail.example.com/admin/ - Go to E-Mail > Configuration
- Click Add Domain and enter your domain name (e.g.,
example.com) - You can leave the default settings for now, but make sure to click Add domain and restart SOGo to apply changes.
After adding your domain, mailcow will provide you with the necessary DNS records to set up for your domain. Just click DNS on the right side of your domain record in mailcow UI, and it will show you the records you need to add.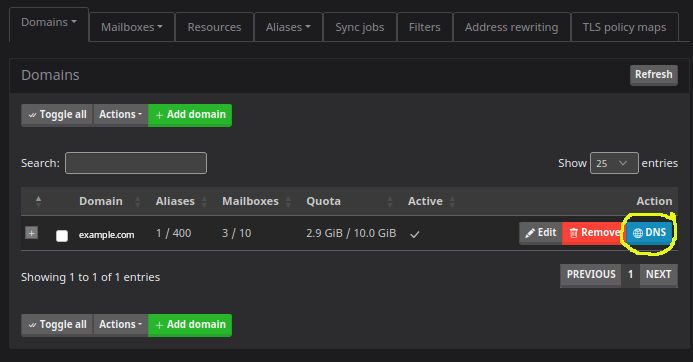
Some are marked as optional, but I recommend adding all of them for better deliverability and security.
In the end your domain DNS records should look something like this:
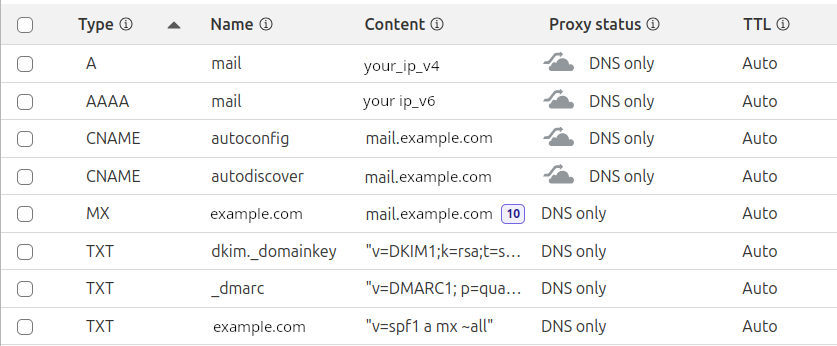
Notes:
- SPF authorizes your mail server to send on behalf of your domain
- DKIM key will be generated in the mailcow UI after domain setup
- DMARC helps prevent spoofing
9. Adding a Mailbox
- Log in to the mailcow admin UI at
https://mail.example.com/admin/ - Go to E-Mail > Configuration > Mailboxes
- Click Add Mailbox and fill in the details:
- Username (e.g.,
john, will createjohn@example.com) - Domain (e.g.,
example.com) - Password, quota, aliases (optional)
- Username (e.g.,
Webmail is accessible at https://mail.example.com/SOGo/
IMAP/SMTP can be used with any email client.
You probably want to set up an info@example.com with an alias of dmarc@example.com.
10. Testing and Checking
Validate your setup:
Check DNS with:
Send test emails to:
- Gmail, Outlook, ProtonMail
- Check if it lands in inbox or spam
Use deliverability tools:
11. Conclusion
You've now set up a full-featured mail server using mailcow.
Next steps:
- Keep Docker and mailcow updated
- Regularly check IP reputation
- Monitor logs and spam filters
- Configure automatic backups
Self-hosting email isn't for everyone, but with care and maintenance, it gives you unmatched control over your communication and data.
Hope you found this guide helpful! If you have any questions or run into issues, feel free to reach out via the contact form.